By Keith Fisher
Have you ever sat with your family around a campfire? You ate supper hours ago, but you were hungry for something, You don’t know what? Digging through the camp kitchen might not be a good idea (especially if you’re not the cook). I may have a solution for you.
25-years ago, I used a tool that pleased a troop of boy scouts and brought me high praise. I’m not sure where the tool came from, and I haven’t seen it for years. I looked for a picture on the internet, and found this on an antiques website. It’s worth a little money now—I wish I’d kept tract of mine. As you can see from the picture, it’s a campfire popcorn popper.
Now you can keep the kids busy and give your family a treat before bedtime. Just pour a little vegetable oil in the bottom, add popcorn, close the lid, and shake it over the fire. You don’t need to look in antique shops either. There are newer versions of my popper. If you can’t find one in your sporting goods store, ask them to order one. Some of the same manufactures that make Dutch ovens make these too. 
Last time, I promised to tell you about an even easier way to make bread in camp. Do you remember the dairy-case bread I made a couple of weeks ago? Let me tell you how to make it.
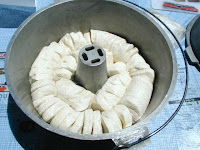
I use an Ultimate Dutch oven. You’ll notice there’s a cone in the center, but I’ll talk about that on another blog. Any cast iron Dutch oven works fine.
Start by spraying the inside of your oven with cooking spray. Next, take five to six packages of  dairy-case biscuits, (The kind that comes in a tube). Line the inside with the biscuits by setting them up on edge. Make a ring, then fill the ring with another ring. Pack them in tight so they will rise and bake together.
When you fill your pot, cover it, and let the bread rise in a warm spot about 45 minutes. Bake with 10 coals on the bottom, (see below for coal placement) 16-18 on top. Keep rotating the lid and the pot like we discussed before and it’s done when it’s golden brown. You can slice the bread and use for sandwiches, or use it for pull-apart, finger bread. With butter and jam, it makes a wonderful treat.

Join the Neighborhood Newsletter . . . Subscriptions are free and joining is easy. Just by signing up and maintaining your subscription to receive the yourLDSneighborhood.com newsletter, you become eligible for our "Thank You" prizes. Our dozens of giveaways range from a trip for two to China, to iPods® (each with a $50 gift certificate for LDS music), cruises, and more. Learn about our amazing monthly, quarterly, and annual giveaways by clicking here.


